Room Configuration
In following, the room configuration dialog and its sections is described.
Also it is decribed based on BBB server as the conference system, since it has the most additional features to cover.
Room setting
The first and most top section in the dialog is about room setting:
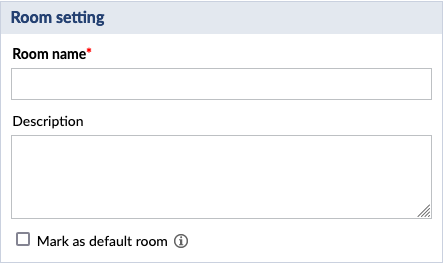
- Room name: the name given to the room item in the plugin (locally) (Required)
- Description: this is a short description text for the room item in Stud.IP (locally)
- Mark as default room: this item is related to the Widget feature of the Meetings Plugin. If you set any room to the default, it means only that room would be processed and listed in the Meeting Widget (start page). For more info, refer to Widget feature.
Conference system
In this section, it is possible to select any VC systems configured by admin followed by their available servers.
NOTE: when there is only one VC system and/or one server is provided, the selection happens automatically.

- Conference system: the so called driver or the VC system to select. Options vary based on the admin configuration (Required)
- Available servers: the server of that VC system to select and create rooms from (Required)
Room size and presets
In this section one could apply those options that are related to room size and basically the preformance and vital behavior of the VC created on the server.
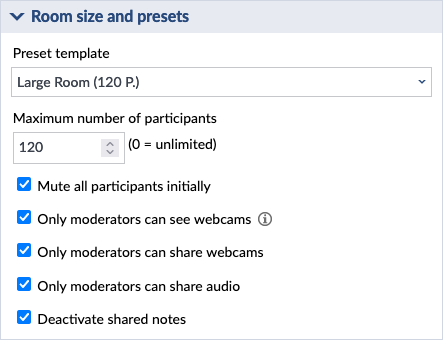
- Preset template: this option is to select presets that are already defined by the admin for the specific server. By selecting one template the following options in this section get their values accordingly.
- Maximum number of participants: this option limits the max number of participants who could join the meeting, that means the system prevents participants to join if the number reaches the limit.
- Mute all participants initially: this option will mute all users when the meeting starts
- Only moderators can see webcams: this option will cause all webcams shared by viewers during this meeting to only appear for moderators
- Only moderators can share webcams: this option will prevent users from sharing their camera in the meeting
- Only moderators can share audio: this option will only allow user to join listen only
- ''Deactivate shared notes': this option will disable notes in the meeting
Recordings
This section contains all options regarding to perform recording in a meeting.
Based on the way of configuring the plugin by admin, it is possible that you don't see this section at all (meaning there is no recording) or some options have different values.
NOTE: when the opencast is selected to manage the recording, it is important to enable and configure this plugin in the course correctly.
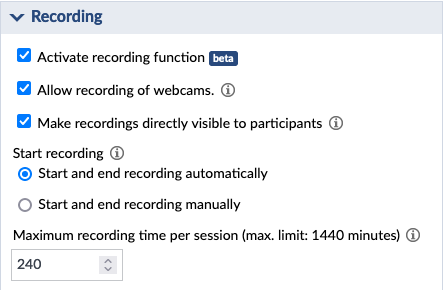
- Activate recording function: this option will instructs the BigBlueButton server to record the media and events in the session for later playback. Depending on how admin decided, the BBB or Opencast might be resposible for processing and playback.
- Allow recording of webcams': this is the Opencast'' specific option that allows the webcams to be included in the recording.
- ''Make recordings directly visible to participants': this option allows students and other couirse users to access the list of recordings to play from.
- ''Start recording': depending on the admin config, this option may or may not be visible. It allows to instructs BBB to (auto/manual) start and end the recording in a session.
- ''Maximum recording time per session': this option sets a timer for a session when it is recording, there will be no time limit for those meetings that do not have recording feature enabled.
Permissions
This section contains those options that are more or less related to permission or have privacy attributes.
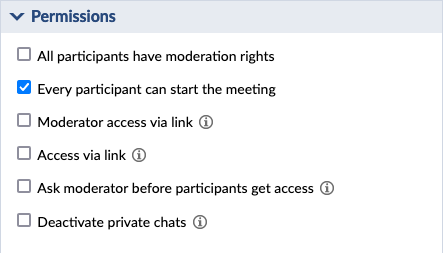
- All participants have moderation rights: this option will give moderator rights to everyone in a meeting.
- Every participant can start the meeting : this option allows everyone to start a meeting. If it is deactivated, guests and students must wait in a waiting lobby to join the meeting after the moderator has joined the meeting.
-> NOTE: when a room is set to be recorded and the options are set to start the recording automatically on start, then it is highly recommended to deactivated this option in order to avoid irrelavant or unwanted recordings at the beggining of the meeting. - Moderator access via link: this option will allow lecturers to invite guest with moderator right. When it is activated, a new button will appear right beside the Participate button in the relative room component item called Invite moderators. Through this button then you could proceed with inviting moderators to the meeting (Please refer to coresponding manual on how to invite moderators.)

- Access via link: this option will allow lecturers to invite regular guest. When it is activated, a new button will appear right beside the Participate button in the relative room component item called Invite participants. Through this button then you could proceed with inviting guests to the meeting (Please refer to coresponding manual on how to invite guests.)

- Ask moderator before participants get access: this option will set the guest policy for the meeting. If activated, moderators will be asked to allow or deny the request of joining each guests in the VC meeting session. If deactivated, meaning the policy is set to always allow the guest join requests without asking moderator.
- Deactivate private chats: this option will disable private chats in the meeting.
Group room
This section contains the selection of any specific group in a course.
NOTE: depending on the course participant groups, this section might not appear in the list when there are no groups available.
When a group is selected, the room item is only displayed and accessible to the users of selected group.

- Select a corresponding group: this option will grant access of this room item only to those who are included in the selected group.
Advance settings
This section is intended to contain extra feature in one place and so far only Welcome message is included.
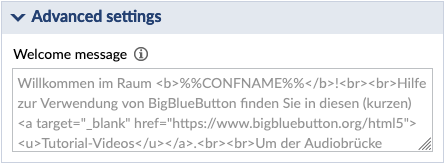
- Welcome message: a welcome message that gets displayed on the chat window when the participant joins. You can include keywords (%%CONFNAME%%, %%DIALNUM%%, %%CONFNUM%%) which will be substituted automatically.
Slides
This section contains the options to manage the upload slides feature to a VC meeting.
NOTE: Depending on the way admin has configured the setting related to upload slides as well as default slides, this section and/or its options might not be accessible to use.
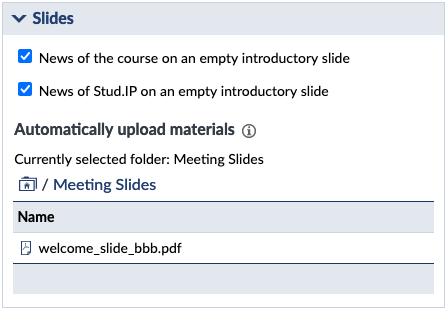
- News of the course on an empty introductory slide: this option will add the course news into default slides generated by the plugin and displayed in the VC meeting session.
- News of Stud.IP on an empty introductory slide: this option will add Stud.IP news into the default slides generated by the plugin and displayed in the VC meeting session.
- Automatically upload materials: via this part, you are able to link a folder to the room containing any slides or materials you would like to show as slides in the meeting session. This part is designed more or less like the course file section, therefore it is assumed that you know how to navigate through folders in this part.
